GUIDE
Ship a Landing Page in 2 Hours with Claude Code
From idea to deployed landing page with email capture, analytics, and OG tags in 2 hours. The exact prompts, stack, and workflow to validate your idea this weekend.
Every weekend you spend debating frameworks is a weekend you didn't validate your idea. I've watched founders burn two months picking between Astro, Remix, and SvelteKit before writing a single line of copy. Meanwhile, someone else shipped a landing page on Saturday, collected 200 emails by Monday, and started building the actual product with real signal.
I've taught over 100 people to build with Claude Code, and the landing page exercise is the one that consistently blows people's minds. You go from a blank prompt to a deployed page with email capture, analytics, and proper OG tags in about two hours. Here's the exact workflow.
The Stack (Don't Overthink This)
Next.js, Tailwind CSS, and Vercel. That's it. Next.js gives you server-side rendering and API routes in one package. Tailwind means you're never fighting CSS files. Vercel deploys whenever your GitHub repo updates.
If someone tells you to evaluate 12 hosting providers and 6 CSS frameworks before building a landing page, ignore them. This stack works for solo founders, for YC companies, and for Fortune 500 marketing teams. Pick it and move.
The Taste Layer
The state of the art is not "ask Claude Code to make a landing page" and hope. Bare Claude Code is good at implementation, but it will drift toward generic SaaS defaults unless you give it taste constraints, reference sites, anti-patterns, and a visual QA loop.
Treat Claude Code like a junior frontend designer with a strict creative brief. Give it the brand, audience, offer, competitors, screenshots, and 3-5 reference sites. If you want an extra taste layer, start with Google Stitch, Figma, a screenshot moodboard, or a frontend-design skill, then ask Claude Code to convert that direction into your real Next.js/Tailwind app.
The goal is to use Claude Code for implementation, not imagination. Your job is to supply taste and constraints; its job is to turn those constraints into working software and keep iterating until the screenshots look shipped.
Your First Prompt
Open Claude Code or Claude Code Desktop and start with a direct build prompt. Claude Code can create the project, set up the files, and tell you when the page is ready to preview.
If you haven't installed Claude Code yet, follow the setup guide first. Takes about 5 minutes.
Now paste this prompt. Swap in your own product details:
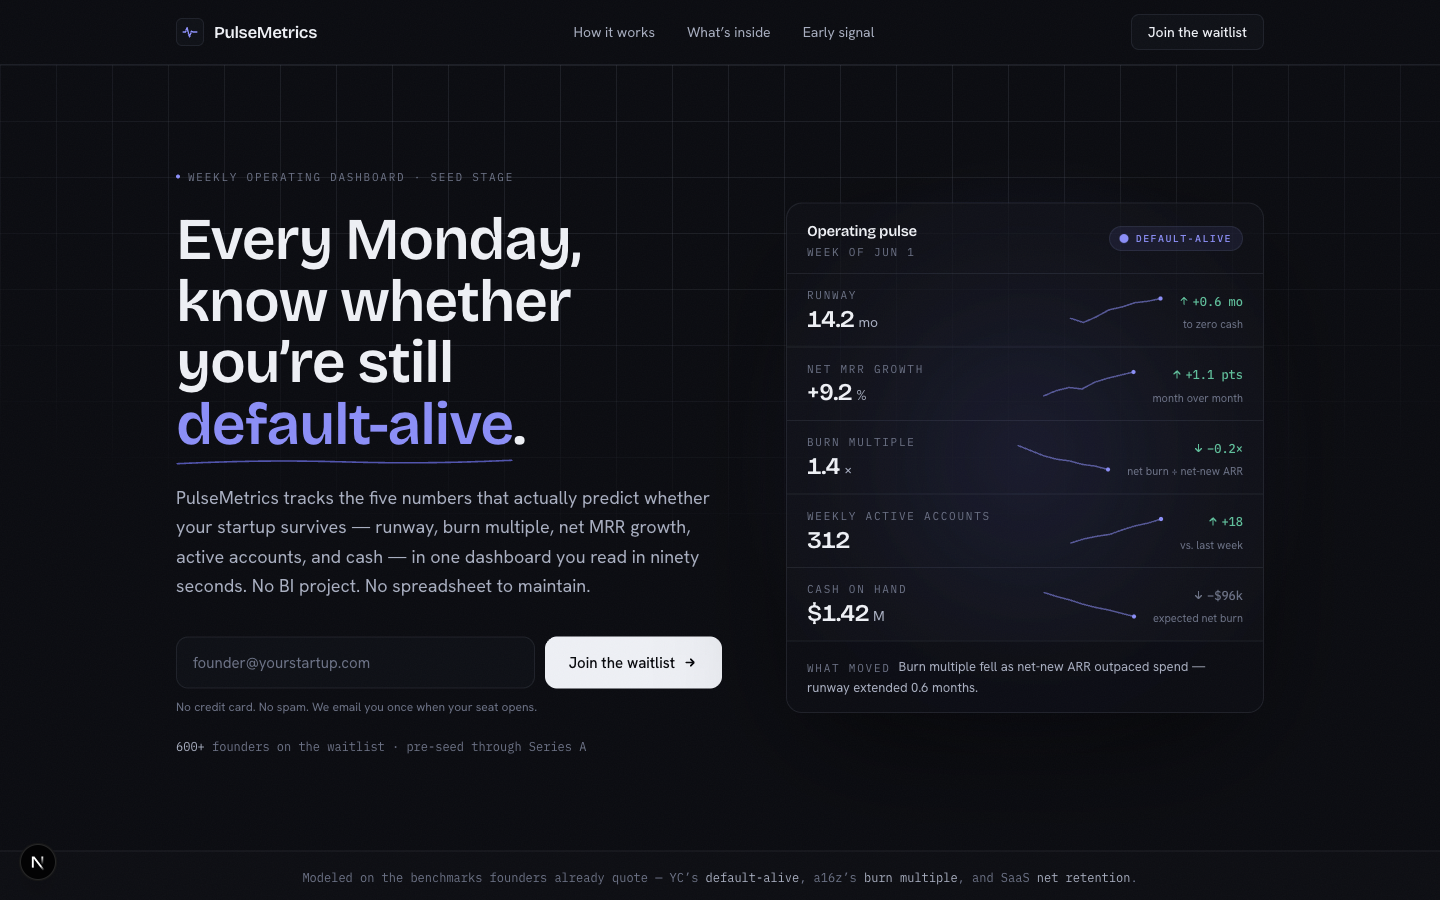
Build a non-generic Next.js landing page for a SaaS product called
"PulseMetrics" that helps startup founders track their key metrics
in one dashboard.

Audience:
Seed-stage founders who need a simple weekly operating dashboard.

Offer:
One dashboard for the 5 metrics that predict whether the company is
healthy. Primary CTA: join the waitlist.

Brand direction:
Calm, analytical, founder-grade, sharp. Use a dark color scheme with
indigo as an accent, but avoid generic purple SaaS gradients.

Reference quality bar:
Use these as inspiration for density, layout, and polish:
- [paste 3-5 reference links]
- [paste any screenshots or Google Stitch/Figma references]

Avoid:
- purple/blue gradients unless you can justify them from the brief
- generic SaaS cards
- centered hero with a vague headline
- fake dashboard screenshots
- decorative blobs or orbs
- stock illustrations
- copy like "supercharge", "unlock", "seamless", or "transform"

The page should include:
1. A hero section with a specific headline, subheadline, and email capture form
2. A "How it works" section with 3 concrete steps
3. A features section with 4 useful feature cards
4. A testimonial or social proof section
5. A final CTA section with another email capture form
6. A footer with links

Implementation:
Use TypeScript, Next.js App Router, and Tailwind CSS. Reuse existing
components where appropriate. For the email capture, create a Next.js
API route at /api/subscribe that accepts an email field and saves it
to a local JSON file for now. We'll hook up a real email service later.

QA loop:
After building, open a local preview, take Playwright screenshots at
desktop and mobile widths, critique the screenshots against this brief,
and revise until it looks like a real company shipped it.
That prompt covers layout, content structure, brand direction, anti-slop rules, implementation constraints, and screenshot-based QA. Claude Code will scaffold the entire Next.js project and build every component. The whole generation takes about 3-4 minutes.
Iterating on the Design
The first pass may still be too generic. That's expected. Now you steer it with screenshots, not vibes. Ask Claude Code to open a local preview and capture the page:
Open a local preview so I can see the page. Take Playwright screenshots
at desktop and mobile widths. Critique the screenshots against my brief,
then revise the page before showing me the final URL.
Claude Code will handle the preview setup and give you a localhost URL. Open it in your browser. Then start giving targeted feedback:
The hero headline is too generic. Change it to:
"Stop Guessing. Start Knowing."
Subheadline: "One dashboard for the 5 metrics that actually
predict whether your startup will survive."

Also, the feature cards feel cramped. Add more padding and
make them 2x2 grid on desktop, single column on mobile.
Each iteration takes 30-60 seconds. Keep going until the page feels like yours. My students usually need 4-6 rounds before they're happy. That's 10-15 minutes of total iteration time.
A few prompts that consistently produce good results:
- "Make the hero section taller with more breathing room." Generic pages always cram the hero.
- "Add subtle animations. Fade in each section as I scroll down." Claude Code will bolt on Framer Motion or CSS animations.
- "The CTA buttons need more contrast. Make them pop against the background."
- "This still looks like a generic AI SaaS page. Remove the decorative effects, increase information density, and make the visual system match the reference sites."
Bolting On Email Capture (For Real)
The local JSON file approach works for testing, but you want real email collection. Resend is the simplest option, and most of the setup is account and domain verification work.
Create a Resend account and create an API key at https://resend.com/api-keys. That is enough to get the integration built and tested. When the page is ready for real traffic, come back to the Resend domains dashboard, verify your sending domain with SPF/DKIM records, and switch the confirmation email to your real domain. Resend's domain setup docs are here: https://resend.com/docs/dashboard/domains/introduction.
Replace the local JSON email storage with Resend.

Use RESEND_API_KEY from the environment.

When someone submits their email:
1. Add them to my Resend audience called "Waitlist"
2. Send them a confirmation email from hello@pulsemetrics.com
   with subject "You're on the list" and a short thank-you message
3. Show a success state on the form

Create a .env.local file for the API key and add .env.local
to .gitignore. Also update .env.local.example with the variable name
but not the real key.
Claude Code will install the Resend SDK, rewrite the API route, handle error states, and update the form component with loading and success states. If you don't want Resend, the same pattern works with Mailchimp, ConvertKit, or even a simple Supabase table.
Adding Product Analytics
You need to know if anyone's actually visiting this page, where they came from, and whether they signed up. PostHog is the better default for a validation landing page because you get page views, custom events, funnels, and session replay in one place.
Create a PostHog project, copy the project key and host from project settings, and keep the official Next.js docs handy: https://posthog.com/docs/libraries/next-js. Public analytics keys are safe to expose when they use the NEXT_PUBLIC_ prefix; private PostHog personal keys should never go in browser code.
Add PostHog analytics to this Next.js app.

Use posthog-js and read the config from these environment variables:
NEXT_PUBLIC_POSTHOG_KEY
NEXT_PUBLIC_POSTHOG_HOST

Track:
1. Page views
2. Email signup form viewed
3. Email signup submitted
4. Email signup succeeded
5. Email signup failed

Also add proper OpenGraph meta tags and a Twitter card so the page
looks good when shared on social media.

OG title: "PulseMetrics - The Startup Metrics Dashboard"
OG description: "Track the 5 metrics that predict startup survival.
One dashboard. Zero guesswork."
OG image: generate a simple OG image using the @vercel/og package
with the product name and tagline on a dark indigo background.

Update .env.local.example with placeholder PostHog values.
This single prompt handles analytics, conversion events, social sharing, and dynamic OG image generation. Three things that most founders either skip or spend a full day configuring manually.
Deploying to Vercel
Create a Vercel account, connect GitHub, and import your repo from https://vercel.com/new. Vercel's import guide is here: https://vercel.com/docs/getting-started-with-vercel/import.
Prepare this landing page for Vercel deployment.

1. Make sure the app builds cleanly
2. Make sure the GitHub repo is ready for Vercel import
3. List every environment variable I need in Vercel
4. Tell me exactly which values are public and which are secret
5. After I deploy, give me a smoke-test checklist for the live URL
Claude Code can take care of the repo prep. Then import the project in Vercel, choose the default Next.js settings, and click Deploy. Vercel auto-detects Next.js and handles the build.
Add RESEND_API_KEY, NEXT_PUBLIC_POSTHOG_KEY, and NEXT_PUBLIC_POSTHOG_HOST in the Vercel dashboard under Settings - Environment Variables. Vercel's environment variable docs are here: https://vercel.com/docs/projects/environment-variables. Your page is live. Custom domain takes another 2 minutes in Vercel's settings.
What the Finished Page Looks Like
After two hours, you've got:
- A responsive landing page with hero, features, social proof, and two CTAs
- Working email capture that stores subscribers and sends confirmation emails
- Analytics tracking every visitor
- Proper OG tags so the page looks professional when shared on LinkedIn or Twitter
- Deployed to a production URL with HTTPS
- Code in a GitHub repo you can keep iterating on

That's a launchable validation page. Share it in communities, run some ads against it, post it on Twitter. If people sign up, you've got signal. If they don't, you saved yourself months of building something nobody wanted.
The Prompting Pattern That Makes This Work
Notice the pattern across every prompt above. You describe what the component should do, how it should look, and where the data goes. You never write code. You never debug CSS. You steer and Claude Code builds.
This is the same prompting discipline I teach in the best practices guide. Specific inputs produce specific outputs. Vague prompts produce vague pages. Tell Claude Code exactly what headline you want, exactly what color scheme, exactly where the email should go. Precision in your instructions translates directly to quality in the output.
Common Pitfalls
Trying to make it perfect before launching. Ship at 80%. You can iterate after you have real visitors. Perfection is the enemy of validation.
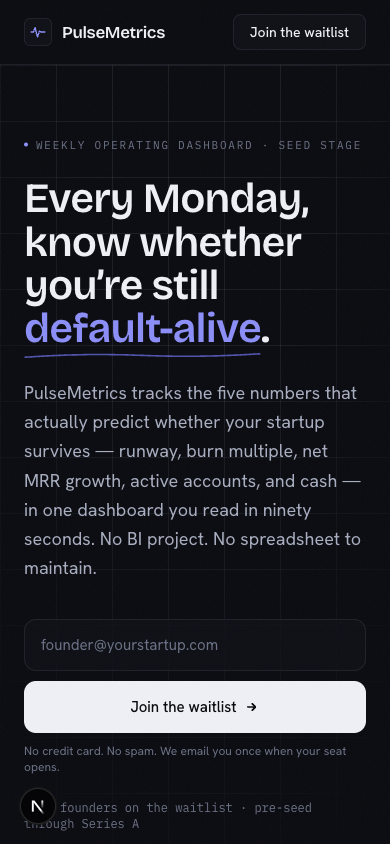
Skipping mobile. Tell Claude Code to make it responsive from the start. Over half your traffic will be mobile. If you forget, just say "make every section fully responsive with mobile-first design" and Claude Code will restructure the layouts.
No analytics. A landing page without analytics is just a billboard in the desert. You won't know if your idea has traction, whether your traffic source is broken, or where people are dropping off. Add PostHog before you deploy.
Stop Debating, Start Shipping
The gap between "I have an idea" and "people can see my idea" should be measured in hours, not weeks. Claude Code collapses that gap. Two hours from blank prompt to deployed page.
If you want hands-on training where I walk you through building and deploying real projects like this, ClaudeFluent is our premium program. You'll ship your first project in the first session. Check out the Claude Code Desktop setup guide if you want to get started on your own right now.